Knitted Wire/Bead Bracelet: A Pattern
Okay, now before I get into the explanation of how I made this bracelet, can we all just take a moment to ooh and ahh about the picture. This, ladies and gentlemen, is what you can do when you actually know how to work your camera. I'm not talking about point and shoot here. I mean, really know how to work it. And, my husband really can work it - well, that's another subject entirely, but he apparently knows about this cool function where you can select a certain portion of the shot to focus in on, blurring everything else. I must learn this, but for now, I'm just in awe of him. Look how sparkly he made it look! My heeeeerooooo!
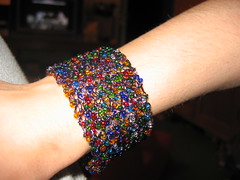
Okay, 'nuff of that. The explanation:
I cast on twelve stitches with a very thin wire (it's not labeled for content, which I assume is copper, nor for diameter, but it's really skinny stuff) using 3mm metal needles (didn't trust metal wire not to hurt wooden needles or plastic). The wire was pre-strung with beads. Go for overkill on this part, because you don't want to have to cut your wire to add more beads. That would just suck. After I was done knitting, by the way, I did weave the two ends in, but not very far. I couldn't see this metal wire doing a Houdini on me.
Okay, so, I knitted in garter stitch for a really long time and my finger ached the appropriate amount (till it was as long as I wanted it - conveniently, and because I sort of swatched, the end of my beads). While you're knitting, you're going to want to pull on both ends of the bracelet to stretch - think of this as blocking while you knit. You just hold the needle in one hand and the cast-on row in the other and pull. This makes the beads more noticeable, not to mention lessening your workload by making you knit fewer rows.
After each stitch was knit, I slipped a bead in before knitting the next stitch. Now, I didn't put beads in the cast-on row (or the cast-off row), but this is one thing I'd do differently next time. How would I do this differently?
Well, in the previous picture I posted, you saw that I made a little link from the knitted part of the bracelet to the clasp. If you like this look, go for it. It's not too hard. What I did is this:
Double a length of wire to weave through the cast-on stitches. Slip 2/3 of the doubled wire through the first stitch, leaving the other 1/3 to be dealt with later. Slip a bead on the 2/3 part of the wire. Then, weave the wire into the next stitch. Continue this way - slipping a bead before weaving into each next stitch till you reach the end of the row. Wrap the wire around the ends of the row once to secure it (though, it's most likely not going anywhere).
Now, to make the link to the clasp...
You should have approximately equal lengths of extra doubled wire on each side of your cast-on row. Cut the folded end of the wire so you can work with the two layers separately. Twist the wires around each other twice. Then, slip a bead onto one of the wires. Twist again, twice. Then another bead, etc. until the chain you've made could meet with another like it from the other side of the cast-on row (forming a triangle), and the bracelet will fit without being too big. Keep the size of the clasp you've chosen in mind when doing this. You don't want to have to cut your wire and redo like some people I know). Repeat this process for the other side of the cast-on row. Then, attach the two links to the clasp in whatever way looks best to you (which may not be my way at all).
Repeat this entire process for the cast-off row.
The other option I would go for if doing this over is this:
Cast on one stitch, using your clasp as the "bead" for this stitch. Then, increase on each side of each row till desired width is reached. Once you've reached your desired length, do identical decreases for the other side. The cast-off row with one stitch on it, will hold the other half of the clasp. Much easier, and, I suspect, much nicer than the way I did this one.
A note about clasps: Unless you find one with industrial-strength magnets that you would trush enough to dangle from this bracelet off the edge of a bridge, don't get magnetic ones. I'm afraid this thing could actually get lost somewhere.
So, there you have it, folks, my recipe for an easy little knitted bracelet. Now, if you're aching to try this but can't stand the idea of the pain this wire can cause you're hands (arthritis anyone?), they also sell elastic thread for jewelry making. I'm thinking this could be a fun alternative, and A LOT faster. If it's stretchy enough, you may even be able to do without the clasp altogether. Just sew your ends together when finished knitting. That could be nice.
All in all, this was a fun project. Reasonably fast, and my hands will heal (it's mostly only my thumbs and forefingers that hurt from manipulating the wire on and off the needles). I'd definitely do something like this again.
posted by The Stitchin' Sheep at 12:32 AM
![]()
![]()


<< Back to main page